OCLM Scheduler - Life and Ministry Meeting - Complete Help Guide & Documentation
Getting Started with OCLM Web Software
If you are just starting to use the OCLM Web Software, after logging in please follow the comprehensive step-by-step instructions contained in our Video Guides below. These tutorials will guide you through setting up your congregation, importing data, creating students, scheduling meetings, and generating professional printouts.
How to Schedule Christian Life and Ministry Meetings:
Complete Resource Library for Our Christian Life and Ministry Midweek Meeting Management:
Access our comprehensive collection of video tutorials, quick guides, and detailed documentation to help you efficiently create student profiles, generate automated schedules, produce professional printouts, and coordinate all aspects of your congregation's Our Christian Life and Ministry Midweek Meeting program.
Video Guides
-
OCLM Life and Ministry Meeting Scheduler Virtual Tour
Comprehensive video tutorial demonstrating OCLM congregation software features for Jehovah's Witnesses. Learn essential navigation, automated scheduling, and congregation setup for efficient midweek meeting organization and coordination. Ideal introduction for new Life and Ministry overseers. -
Video Guide 1: How to Import Your Data
Complete data migration tutorial for OCLM software. Import congregation data, student records, and talk history from CSV files, backup archives, and legacy TMS systems including Majestic Software, JW Scheduler, and TMSware. Includes troubleshooting common import errors. -
Video Guide 2: Setting up your congregation
Essential congregation configuration tutorial for OCLM scheduler. Set meeting days, times, and classroom arrangements. Configure elder assignments, student qualifications, and multi-school support for accurate automated scheduling in JW congregations. -
Video Guide 3: Editing Your Settings
Advanced OCLM software customization guide. Configure email templates, SMS notifications, language preferences, and printout formats. Optimize scheduling preferences and communication settings for your congregation's specific workflow requirements. -
Video Guide 4: Creating a Joint Account
Collaborative scheduling setup for Life and Ministry overseers. Create shared Google or Microsoft accounts for multiple brothers to coordinate scheduling responsibilities. Manage user permissions and ensure seamless schedule collaboration with single subscription access. -
Video Guide 5: Creating/Editing Students
Complete student database management for OCLM scheduling. Add new students, edit profiles, set qualifications for different talk types, manage availability periods, and track assignment history. Essential for accurate automated scheduling and progress monitoring. -
Video Guide 6: Setting up Schedules
Master OCLM automated scheduling for Life and Ministry meetings. Create weekly schedules, assign students to Bible reading, initial calls, and ministry demonstrations. Handle substitutions, resolve conflicts, and optimize assignment distribution across multiple schools. -
Video Guide 7: Printouts
Professional printout generation for JW congregations. Create information board schedules, student assignment slips, chairman worksheets, and meeting outlines. Customize formats for different paper sizes and multi-language support with Word and PDF exports. -
Video Guide 8: Part 1: Sending Assignments/Talk Slips
Digital communication system for OCLM assignments. Send automated assignment notifications via email, WhatsApp, and SMS. Generate personalized talk slips with study points and customize communication templates for efficient student coordination and reminder management. -
Video Guide 8: Part 2: Sending Reminders/Editing Templates
Advanced communication management for congregation scheduling. Configure automated reminder systems, customize email and message templates, and streamline bulk notifications for all meeting participants. Optimize communication workflow for student engagement. -
Video Guide 9: Transfer a Subscription
OCLM subscription management and data migration tutorial. Transfer paid subscriptions between email accounts, migrate congregation data during overseer changes, and maintain scheduling continuity with backup and restore procedures for seamless administrative transitions. -
How to view video guides with translated subtitles
YouTube accessibility guide for OCLM video tutorials. Enable auto-translated subtitles in multiple languages for international JW congregations. Step-by-step instructions for accessing closed captions and subtitle settings to support diverse congregation needs.
Set-up
- Import/Restore your OCLM Web Data
- Import/Restore from CSV files
- Set Congregation Information (name, meeting day and time, # schools)
- Scheduling All Midweek Meeting Parts
- Switching Printout Languages
- Login with another email address (e.g. perhaps a new shared email account) or transfer a subscription and transfer your data
- Share Information between the L&M Overseer and assistant (if applicable)
- Trouble Logging In? Can't Sign-in? Can't Login?
Students
- Students - Add/Edit/Delete Students/Participants and their profiles
- Students Talk History - View/Modify details about a Students Talk History
- Students Time Away
- Auto Assign Schedule week with students
- Manually changing students that are Auto-Assigned
- Some Students Not Assigned / Blank Student
- Hide school schedule weeks
- Special Weeks - Convention, Assembly, CO Visit
- No Student Names Showing on Printouts?
- Send Student Assignments/Talk Slips by Email/WhatsApp/SMS
- Send Student Reminders by Email/WhatsApp/SMS
- Change Template Text for Email Student Assignment and Reminders
- Backup your OCLM Web Data
- Import/Restore your OCLM Web Data
- Import/Restore from CSV files
- Import/Restore from Other CLM Software
To Create/Assign a Schedule - Quick Guide:
- On the Menu click Schedules
- Find the Week to schedule. Click on the 'Auto Assign' button under the 'Assigned Students' column. If you would like to schedule student and non-student parts separately or manually assign click on those buttons.
- To view and/or change a student for that week, click the "View" link for that Week's schedule row under the 'Assigned Students' column. Then click “show” under the ‘suggested alternates’ column for each student you wish to edit. Make the needed changes and click the save button. For more information see Manually Modifying Schedule or Video Guide 6: Setting up Schedules.
To Print a Schedule - Quick Guide:
- After scheduling desired weeks, (see Create/Assign Schedule – Quick Guide above) checkmark all the weeks you wish to print by placing a checkmark in the first column called 'select to print'.
- From the print dropdown list located at the top left, select the Schedule you wish to print.
- Only the weeks selected by checkmark in the first column will be printed.
- Click the Print button.
- A save file box will appear. The file will then appear in your Word document editor.
- In your Word document editor/PDF reader, make any adjustments you wish, then print through your document editor.
- After scheduling desired weeks, (see Create/Auto Assign Schedule – Quick Guide above) checkmark all the weeks you wish to print by placing a checkmark in the first column called 'select to print'.
- From the dropdown list at the top, select Slips (4 per page or 1 per page)
- Click the Print button.
- A save file box will appear. The file will then appear in your Word document editor.
- In your Word document editor/PDF reader, make any adjustments you wish, then print through your document editor.
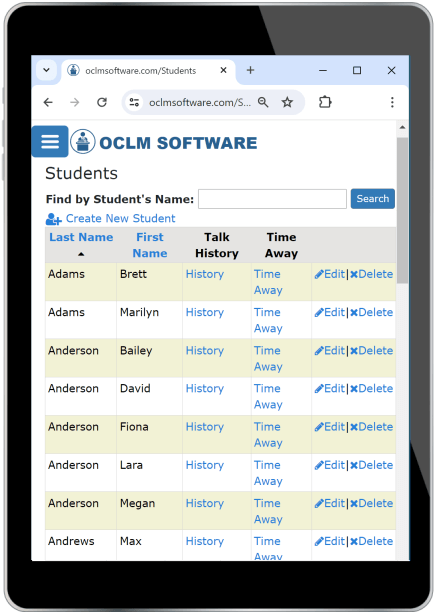
Students Page:
After login, the menu screen will appear. Click on Students.
If you have not imported from a previous TMS/OCLM backup, you can begin to add the names and profiles of all the students/speakers in your congregation.
A student’s profile is very important in regards to scheduling the meeting parts correctly. The auto-assigning algorithm takes into consideration all the information in a student’s/ speaker’s profile. It considers the type of talks they can give, the classrooms they can be in, if they are currently active, their time away, talk history etc., all are considered when auto-assigning a participant to a talk. For more information please see Video Guide Video Guide 5: Creating/Editing Students
Add Students:
Click on the Create New Student link at the top of the student page. Enter student information and click save.
Edit Students:
To edit a student and their profile information, click on the 'Edit' link across from student’s name. Modify the students / speakers information and click the save button.
For entering the student's WhatsApp phone number in the correct format please see this guide: WhatsApp Number Format Examples.
Delete Students:
To permanently delete a student, click on the 'Delete' link across from the student’s name.
If it's possible the student/speaker will become active again in the near future it’s better to uncheck the box under the “active” column for that student. To do this, click Edit across from the students name. Then on the Edit page, you can uncheck the active checkbox and click save. This way you will not need to re-enter their information when they become active again. When the Active box is unchecked, the participant will not be auto-assigned and thus not assigned any talks.
Sort Data:
It’s easy to sort the table grid data on many of the tables. Click on the Column Heading Once for ascending order, and again for descending order. You will see an arrow head in the column header indicating the sorting direction.
For performance considerations, the default view will display only 10 rows of data at a time. This data can be paged through to see more than 10 rows at a time. If you would like to see all rows of data, click on the link 'View All Students' link.
The History column contains a link that lets you view a student’s/speaker’s talk history details. For more information see Students Talk History. The Time Away column contains a link to see a student’s time away. For more information, see Student Time Away. Remember to always hit the save button when additions, edits, or deletions have been completed.
Student Talk History
This area is accessible from the Student Page. To view or modify a student’s talk history or if you want to enter talk history for a new student, click the 'History' link under the History column.
In the Students Talk History page, all talks given or talks that have been scheduled are viewable and are always editable.
The Student Talk History will populate automatically when a schedule is Auto Assigned or manually edited on the Schedules screen. It isn't necessary for the L&M overseer to add talk history, unless they wish to add old talk history. When first setting up your software as a new user, it’s good to add the last talk given for each student if possible. This will make the scheduling algorithm more accurate and not schedule a student for a talk if they have just given one.
Student Time Away
This screen is accessible from the Student page. To view or update a student's Time Away dates, click the 'Time Away' link in the Time Away column.
This screen provides the ability to View, Add, Edit or Delete a student’s Time Away dates.
The student will not be scheduled to give talks for these dates.
If the student will be away for an unknown period of time, it might be best to set the Student as Inactive. This can be done by clicking edit across from the students name, unchecking the active box and clicking save.
When entering a student Time Away it's best to start a student’s unavailable dates on a Sunday and end on a Sunday. This way, it will cover the entire schedule week (If the congregation meeting day has been not been set to another day, by default it will use Monday as the meeting night).
Schedules Page
On this page, the OCLM basic schedule can be Imported, Added, Edited, or Removed. You may add schedule weeks gradually as needed and when available by using the 'Get Monthly Workbook (MWB) Schedule' button.
Get Schedule Data
Click this button to automatically add weeks of basic schedule data. It will not overwrite any weeks, only add to your list. Click often to get the latest data available.
Auto Assign
The auto assign will assign students in an alternating pattern, so a student is assigned a balanced amount of talks, talk type and school type.
A special event, such as assembly or convention will not assign any students to that week.
To assign students, click the 'Auto Assign' link under the 'Assigned Students' column for the desired week.
When the 'Auto Assign' link is clicked for a particular week, the checkbox under the column 'Been Assigned' will be checked. You can always redo a week’s schedule by clicking on the 'Clear' link and then the 'Auto Assign' link again.
Some Students Not Assigned / Blank Student
If you are experiencing many blank students after clicking the auto assign button, make sure there are enough students able to give each talk type and enough students have the 'Active' checkbox checkmarked on the students page.
Please note: It’s very important to Auto-Assign in chronological order. The accuracy of Auto-Assign is greatly influenced by the last talk date given by a student. An insufficient randomization may occur when a schedule week was Auto-Assigned far in advance, such as many months in the future, done by mistake or for testing purposes. If the future schedule week is not cleared of students, then this will affect the Auto-Assign scheduling for previous weeks.
Manually Modifying Schedule
To view or update (swap students/speakers, change schools, change brother to sister talk and then add an assistant with the proper gender etc.) for a scheduled week, click the 'View' link under the 'Assigned Students' column and make those changes.
Clicking on the 'Suggested Alternates' link will display a list of suggested Alternate Students to assist the overseer in choosing another student for a talk. This list includes the students who have not done that particular talk in that school and have not given any talk for the longest period of time. By displaying many alternate students for the assignment, this allows the overseer to find the best or suitable replacement.
If you would like to assign a brother for a talk that currently has a sister, change the student by selecting a brother from the student Name drop down list. Then also change the assistant, since brothers talks usually are with brothers and sisters with sisters. Hit the save button after modifications are complete.
After creating a schedule, you may see the student assigned is blank. This indicates there wasn't a suitable student for that talk.
If you are experiencing many assigned students that are blank, please read these possible reasons in the FAQ help.
For more help, please see Video Guide 6: Setting up Schedules.
Hide School Schedule Weeks
Buttons have been added to the Schedules screen to hide from view the schedule weeks that have already past. After clicking on the Hide weeks button, select the From and To date range. The data is not deleted, so it can be retrieved and displayed again with the show button and selecting the correct From and To date range.
Schedules that were manually hidden by the user can be easily viewed again, by clicking on the show week's button on the schedules page.
Special Weeks - Convention, Assembly, CO Visit
If it is a special event week, on the schedules page, click Edit on that week. Then in the Edit Schedule Week page, change the Type of Week to the type of special event and save.
Then click the auto assign button. This will not assign any students, but will mark the week as been scheduled. The printouts will also show this special week.
Printouts:
On the Schedules page, select the printout type you want (Info board schedule, Slips, Worksheet, Chairman's Outline) from the printout dropdown.
Checkmark the weeks to print (that have been populated with students) located under the Select for Printing column.
Then click the Print button. This will make a Microsoft word document (Schedule for Info board and Slips are available in PDF format as well) that is then presented for download/opening. In your Word editor/viewer click the Print button if your device supports printing.
If you have Word edit capabilities you can make changes to the schedule such as font size/style, bold, underline, margins, spacing and layout, add text etc).
To print on A4 paper or another paper size other than letter size, in MS Word click on the Page Layout tab, then select the paper size in the Size dropdown. Or another way is, after clicking File -> Print, in the print settings displayed, change the paper size to the correct size. The Word document will auto size the contents of the word document to that new paper size.
Note: If you do not want your printout to be easily edited, use the File -> 'save as ...' and choose 'pdf' from the 'Save as Type dropdown' list.
No Student Names Showing on Printouts?
If there are no student names showing on the printout, the cause is usually because you still need to 'Auto Assign' the desired weeks you would like to print on the Schedules page. After auto-assigning, in the first column called 'Select to Print', place a checkmark in the box for each week you would like have on the schedule printout. Remember, the week(s) need to be 'Auto Assigned' and filled/edited with students before printing.
Send Student Assignments/Talk Slips by Email/WhatsApp/SMS
To send talk slips by Email/WhatsApp on your desktop or mobile device first, navigate to the Schedules tab. Click the "View" link on your desired week then click the "PDF" or "Word" link for the desired student talk to download the talk slip. Then click the Email or WhatsApp assignment link which will open a new message in your default email client or WhatsApp. Then attach the file to your message and send.
To send talk slips by SMS text message you will need to send in two parts. First navigate to the Schedules tab. Click the "View" link on your desired week. Then click the "Mobile SMS Assignment" link. This text message contains the information for their part already but if you would also like to send the talk slip you can click on the "PDF" or "Word" link for the desired student talk to download the talk slip to your mobile device. Then go into "Files" or downloads on your device, find the downloaded slip and select the send by text message feature.
Please see Video Guide 8: Part 1: Sending Assignments/Talk Slips for more info.
Send Student Reminders by Email/WhatsApp/SMS
To send reminders by Email/WhatsApp on your desktop or mobile device, first navigate to the Schedules tab. Click the "View" link on your desired week then click the Email or WhatsApp reminder link which will open the reminder message in your default email client or whatsapp.
The "Mobile SMS Reminder" link will only appear when you are on a mobile device. Follow the same steps above and click the "Mobile SMS reminder" link to send your reminder by text message.
The message will consist of the date, talk type, students name, assistant (if there is one), school number/classroom, study point, and the opening and closing paragraph if set in the settings area.
Email all Feature
You can also choose the email all feature to email reminders to all participants for a selected week. First navigate to the Schedules tab, then click the "View" link on your desired week. In the top left corner click on the "Send Email Reminder for all parts" link. This will open in your default email client and will send to all participants for that week that have an email address recorded on their student page.
How to send assignment/reminder emails using Gmail?
Please see this site to set your internet browser to use Google Gmail.com instead of another default Windows, Android or iOS email application: Set Gmail as Your Internet Browser's Default Email Client for Reminder Email Links.
Change Template Text for Email Student Assignment and Reminders
On the Settings page, you can edit the first paragraph and last paragraph of both the Assignment and Reminder Messages. The "send email reminder for all parts" email does not have an editable template but can easily be edited in your email provider.
Please see Video Guide 8: Part 2: Sending Reminders/Editing Templates for more info.
Why can't I see all options to send Email/WhatsApp/SMS assignments and reminders for each student?
If there is no email address/whatsapp number/SMS number recorded on the students page those options will not appear for that student. Please go to the Students tab, select your desired student click edit and add in that information to see those options.
Information Board Schedule Printout:
There are two printouts available for the information board. One shows the study points for each student and one doesn’t. The schedule printout also supports two schools and is a .docx document.
You can make any further adjustments / edits to the Schedule in the Word editor/PDF Reader if supported on your device before printing.
Student Assignment Slips Printout:
You have the option to print 1 or 4 slips to a page. The filled Slip printout is also a .docx word document (and PDF as well). You can make any further adjustments / edits to the Slips in the Word editor/PDF Reader if supported on your device before printing.
Chairman’s Worksheet Printout:
This printout has a simple design that allows you to add Benefit book comments, notes and timing for each student talk in the Main and Auxiliary classrooms (if applicable).
Chairman's Outline Printout:
This printout is similar in layout to the Schedule for the information board printout. However, it provides additional comment boxes after each part as well as boxes for an intro, conclusion and congregation announcements. This file can be sent to the chairman, so that the chairman for that week can enter additional text in these boxes for his use during the meeting.
Congregation Info
The Congregation screen is where the Congregation Name that is displayed on the Schedule Printouts can be edited. Also you can change the number of schools and meeting day and time.
This will set the correct number of schools and meeting day when the basic schedule information is imported. Note: This will not affect weeks that have already been imported.
When you switch the number of schools, this will not affect weeks on the Schedule page that have already been imported.
However, after changing the number of schools from two to one for example, when you import new workbook schedule weeks, there will be only one school.
For weeks already imported, on the schedules page, to change them from two to one for example, you can edit a schedule week (edit link at the end of the row) and change the number of schools/classrooms to one and then auto-assign.
Already imported but not yet auto-assigned weeks can be deleted and imported again to reflect the changes in the number of schools or meeting day or both can be manually changed.
In summary, the number of schools and meeting day will be applied when you import more/new weeks.
Settings
The Settings screen is where the Interface and Print Language can be changed. The language together with specific country can be selected. This will influence the date format displayed. When the print language is set, then created Schedules, Worksheets, Outlines, Slips will have the Titles and Dates/Times in the language selected. The interface language will display the Screens in the login area with the selected interface language and date/times in that language format.
Languages
The OCLM Web scheduler has been translated into English and Spanish.
Many computers/browsers are already setup to display these various language font characters. However, if your computer or device needs additional fonts to display various languages, please refer to your operating system documentation for instructions.
Switching Printout Languages
If you were previously using English printouts and switch to another language, the weeks you have already imported will now print in your new language but the talk titles will still be in English. To fix this you could either manually edit those talk titles in Microsoft word before printing or you can delete future schedule weeks and then click the get schedule data button to get the schedule data for the next few months in your new language. However, you will lose any scheduled students for those weeks. You would then have to auto-assign those weeks again. If you are having any issues switching languages please feel free to contact us at info@oclmsoftware.com.
Scheduling all parts
If you are the L&M overseer and are now scheduling all midweek meeting parts, there is no need to make a new account or pay anything extra, you can continue using your current subscription.
Now under the "Settings" tab, all accounts will have their role automatically set to "BOTH". This will allow you to schedule the whole meeting. You can use the current auto-assign buttons to schedule either the whole meeting at once, student parts/non-student parts separately, or schedule manually.
Before scheduling you will need to add some information under the "Students" tab. First make sure you have added all Brothers that can do parts in your congregation. You will now see after each person's name more columns including all the non-student parts. Check all boxes that apply for each brother.
For more information on this adjustment of the L&M overseer scheduling all parts, please view the revised version of the Instructions for Our Christian Life and Ministry Meeting (S-38) available on jw.org and in JW Library.
Login with another email address or Transfer a Subscription:
To login with another email address (e.g. perhaps a shared email account) and transfer your data, you will need to make a new account (30 day free trial) with the new email address.
Please see the Video Guide: Lesson 9: Transfer a Subscription
If you already have a one year subscription, the one year subscription can be transferred to the new email address. Please email us the old and new email addresses for the transfer.
If you need to move your data from your old account to the new email address account please do the following:
Login to your old account. Then on the Data page, click the backup button (this backup button is only enabled with a one year subscription), save the file, and logout (you may need to logout of Google/Microsoft totally by going to Gmail/Hotmail click logout from there).
Then login with the new email address. Then on the Data page, click restore button, and select the backup file saved in the previous step.
To learn more about using a Joint Account please read below:
Joint Account: Share Information between the L&M Overseer and his assistant (if applicable)
There are two ways to share schedule information with another brother:
The first way is to complete your portion of the schedule and then email/cloud file share the schedule word document. The other brother can then edit the document to complete the schedule or copy the names to his schedule.
The second option is for two brothers to create a new Google or Microsoft email account together. Then they can both login using that account and modify their portion of the schedule. Only one paid subscription is needed for both brothers with this second option.
Please see the Video Guide: Setting up a Joint Account
Trouble Logging In? Can't Sign-in? Can't Login?
First login to Google at mail.google.com OR Microsoft at outlook.live.com with the email address you used to login to OCLM.
If successful, then go to oclmsoftware.com and you will be automatically logged in.
If unsuccessful, please note that you may have more than one email address account that you are using on your computer/device. You may be trying to automatically login to oclmsoftware.com with one of your other email addresses. If so, change/switch your account by clicking on the circle at the top right (either on Google or Microsoft email pages), or sign-out of your email account. Then select the email address that you used to login to OCLM and sign-in. Perhaps, you had used one email address for the 30 day free trial, but now have a subscription with another email address, please login with the email address associated with your subscription. If you can successfully sign-in through your email provider, then you will be successful logging in with OCLM.
Let us know if you need further assistance.
Data:
Backup OCLM Web Data:
To backup your current data perform the following steps:
-
On the 'Data' screen, click the [Backup Data] button and Enter the filename/location in the Save
File box. Enter in a filename and location where you will remember the backup
will be stored.
Data backups are your responsibility. Please backup often.
Note: It’s highly recommended to save the backup to an external device, such as a removable USB drive incase of personal computer hard drive crash.
Restore/Import Data from OCLMSoftware Web Backup:
On the 'Data' Screen, Click the [Import Data from OCLM zip file] button. This will prompt you to enter and Enter/Select the Filename/Location of the backup file zip. Make sure you select your very last backup. Note: This will overwrite all your data when you restore with the data contained in the backup file. Perhaps you were using another oclm software. Then an import might not be possible into our oclm web.
Oclm web backup files would be in a file name format like 'Data_Backup_2018_07_19T20_07_14.zip'
Also see Video Guide 1: How to Import Your Data to import from an OCLM backup or CSV files.
Restore/Import Data from CSV Files:
Import from other sources such as majestic software khs desktop, jw scheduler, New World Scheduler, NW Scheduler, tmsware clm explorer desktop by filling in Student and Talk History Data in the provided 'Students.csv' and 'TalkHistory.csv' templates.
On the 'Data' Screen, Click the [CSV File Import Area] button. This will send you to a new page, and then follow the steps shown. When you click on each Import button, you will be prompted to enter and Enter/Select the Filename/Location of the csv file. Note: This will overwrite all your data when you restore with the data contained in the csv file.
Also see Video Guide 1: How to Import Your Data to import from CSV files.
User Guide Summary
If you would like further details on any of the above sections please email: info@oclmsoftware.com